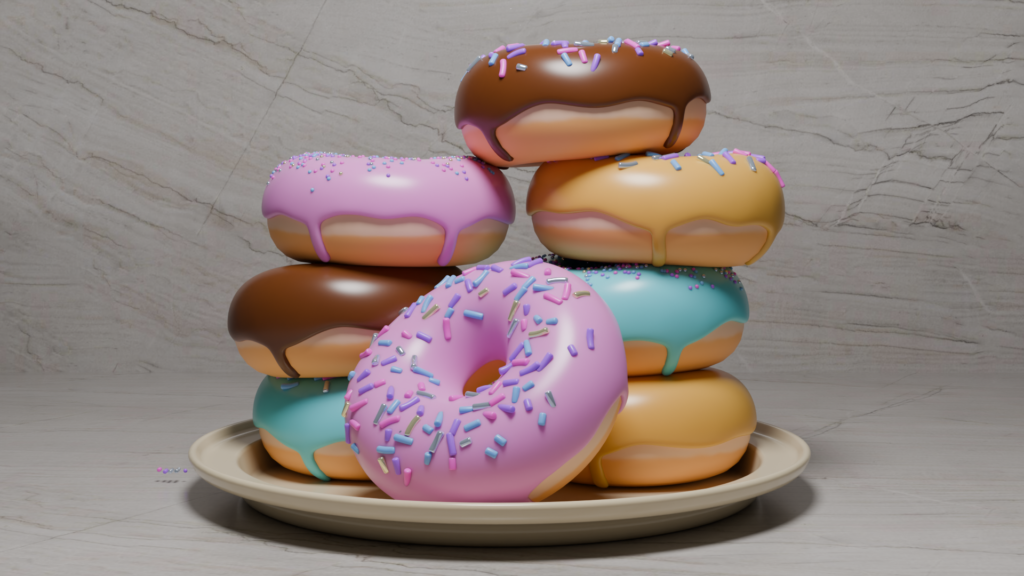
In this session, I made the plate that would support my donuts. Then, to make a stack of donuts, I duplicated them a number of times and rotated them so they wouldn’t look the same. I also leaned some at slightly different angles to make the stack look more natural.
For the plate, I made a simple circle and used the “vertices select mode” to rise the edges up. After jutting out more faces from the risen vertices (to give the plate a risen edge), I bevelled the edges and applied a solidify modifier to give the plate thickness. I rounded the edge of the plate (held C while bevelling edges so as to give it the perfect rounding) and gave the plate a shine and a touch of colour to make it look more realistic.
Rising the edges of my plate.
Following this, I made my stack of donuts. Blender Guru made sure to tell us to face one forward so it was easy to tell they were donuts, since the camera for the rendering will be showcasing the donuts from the side. Here are how they turned out!
After this, I wanted to vary the types of donuts since they were all the same colour. I swapped the types of sprinkles on each donut in the modifier tab and changed the colour of the donuts in the material tab. I moved the light source to the front and got a picture of where I’m at so far in the tutorial, and I am extremely happy with how it’s looking thus far!
Big emphasis on the plate as I am very proud of how it turned out! Also, please ignore the magic floating sprinkles off to the side!
Below is the video I used for the tutorial at this leg in the journey. Once again, credit goes to Blender Guru for his amazing work and I am very excited to look at the next final steps in his playlist!
Today I was able to give my sprinkles some colour and learn how to light a subject properly! Honestly my biggest takeaway from this session was how big of a difference lighting makes in the render. It’s honestly night and day.
I linked the materials of my sprinkles together to make the colour and shading settings apply to all of them, and also learned about a couple of new nodes. I used the Colour Ramp node to to assign colours to the sprinkles and the Object Info node to randomize them on the donut. Now, in terms of the actual donut, it’s DONE!! The following steps were about rendering and how to make the donut look pretty.
Donutttts
Finally the rendering process can begin. By default, Blender uses a program called EEVEE to render, which is the fastest, but it also creates the nastiest looking render known to man. SO, instead, I switched from EEVEE to Cycles which essentially renders it in real-time in the viewport. Cycles makes the render much prettier, but it works much slower. When the viewport is moving, the objects appear pixelated and choppy. When you stop moving the viewport around, it gradually sharpens. Below is a comparison between EEVEE and Cycles.
A nasty, dark, blurry shadow EEVEE render.Cycles as the viewport is moving. Oof.
To minimize pixelated choppiness, I switched from my CPU to my GPU for rendering and ticked the “Denoise” option for when the viewport is in motion. Switching to my GPU made the process much faster, but it’s still only moving at the speed of what my laptop’s Apple M1 Pro chip is capable of. If I ever wanted to upgrade, Blender Guru brought my attention to one site where Blender users can label which chip they’re using and how fast it renders their scenes. This information can be found on Blender’s Open Data Benchmark page and essentially ranks the top chips available on the market.
With rendering settings in play, I learned a bit more about how to use the camera. Specifically, I learned about a feature that allows you to control the camera and viewport as if it were a video game. Hitting Shift+~ (tilde key) allows you to move around with the WASD keys. Once you like where your view is at, left clicking once will exit that mode. For people who are accustomed to gaming on a PC, this makes moving the camera around a LOT easier.
Next up was lighting. When light hits an object in real life, it scatters it a bit inside before leaving the object again. Sometimes, this bounces that light onto the surface of objects close by. To replicate this, I applied subsurface scattering to the icing of my donut. This made the lighting appear much softer and gave the donut a more colourful, realistic tone. We can see what the shadows looked like before and after this feature was implemented below:
The shadows of my sprinkles before subsurface scattering.After subsurface scattering! The shadows are now much softer.
I also applied it to my sprinkles! This made the lighting more coherent overall and looks AMAZING.
Legitimately looks delicious. The shiny sprinkles are silver and gold and have been given a metallic sheen!I want to eat them.
I’m amazed at how much better everything looks with the proper lighting implemented. I have linked the video I used for this part of the tutorial below, which is once again made by Blender Guru.
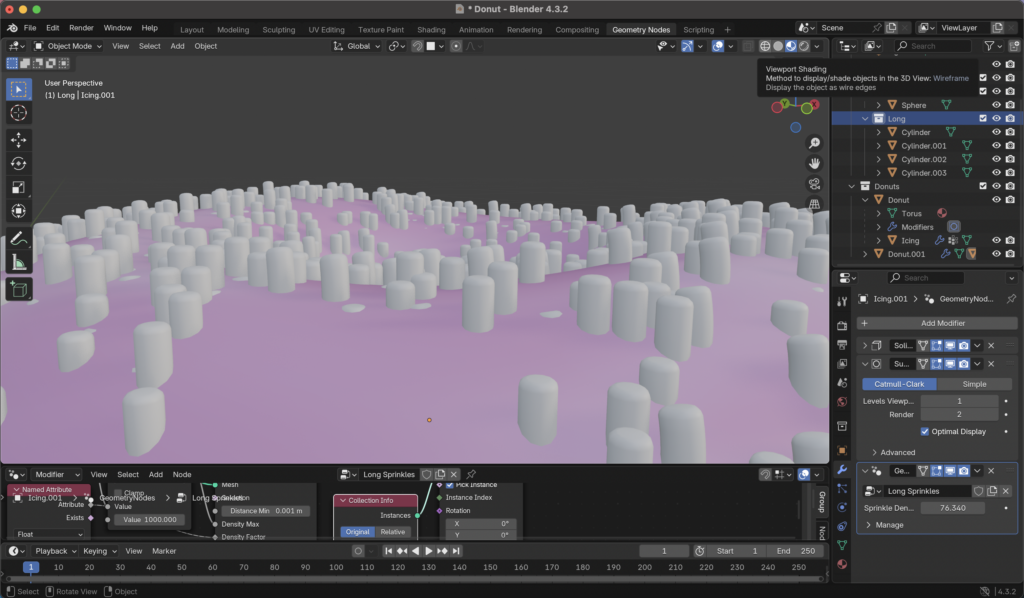
Today I was able to add long sprinkles to my Blender donut! Once again, this was not a simple a task as it seemed it would be. I started by creating a cylinder mesh, which is pretty standard by now as it’s just hitting Shift+A and selecting the option in a drop-down menu, but I then learned how to bevel it to remove the unrealistic, sharper edges. Selecting the top and bottom faces in Edit Mode, I hit Ctrl+B to round out the edges of my sprinkle. I then duplicated it (Shift+D) three times to create a shorter one, a longer one, and a curved one. The curved one was a bit more complicated as I had to add a deform modifier to the cylinder and bend it to the degree I wanted. In this process, I also learned how to move the origin point of each object to their centre (which makes the object rotate around it’s centre rather than above or below it, which Blender Guru says is basically the shape’s “centre of mass”). Below, I’ve included a picture of my sprinkles before being added to my donut!
Sprinkles and my COLOSSAL donut
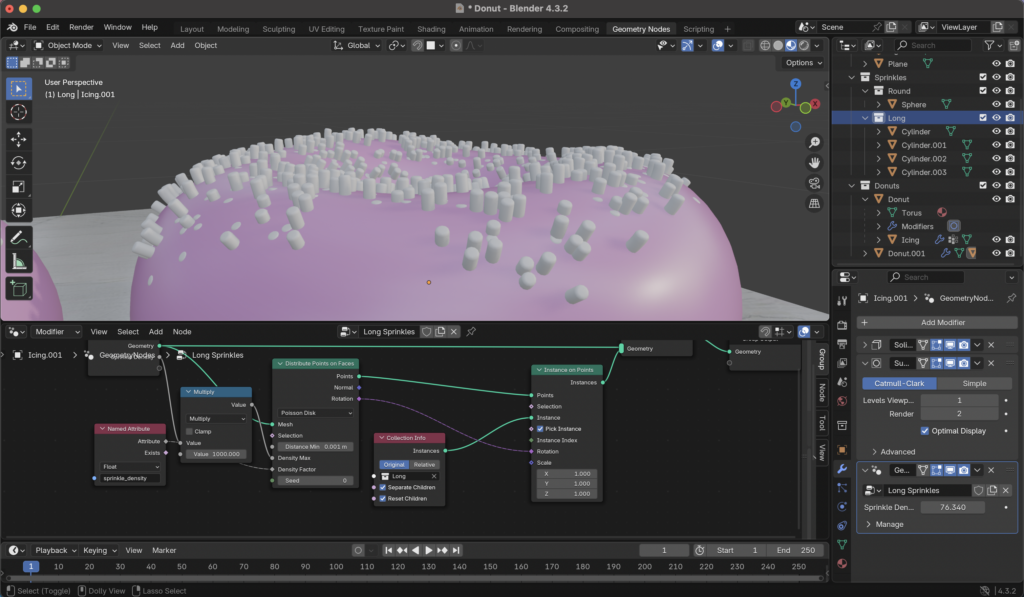
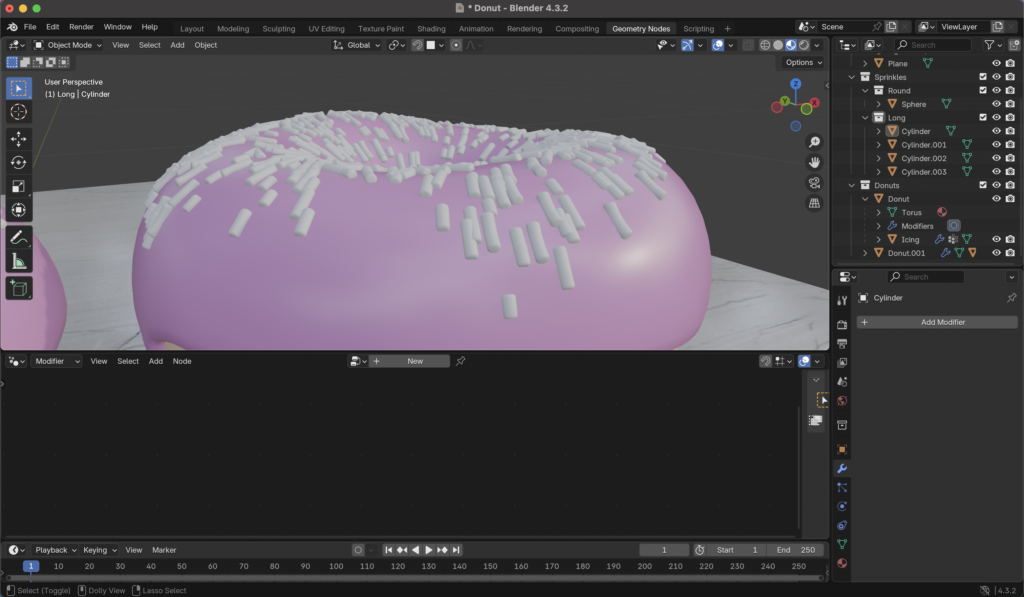
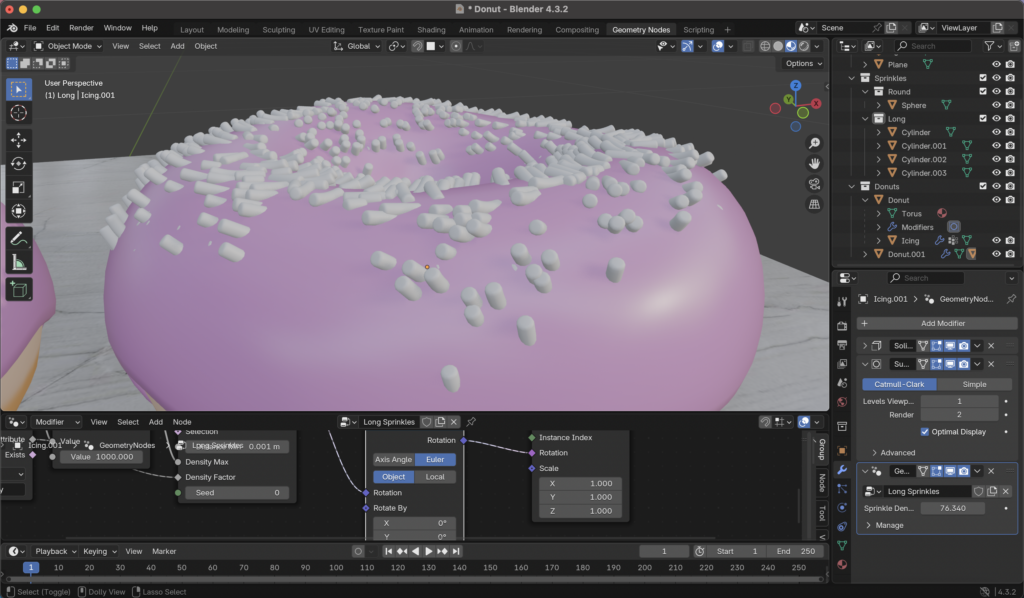
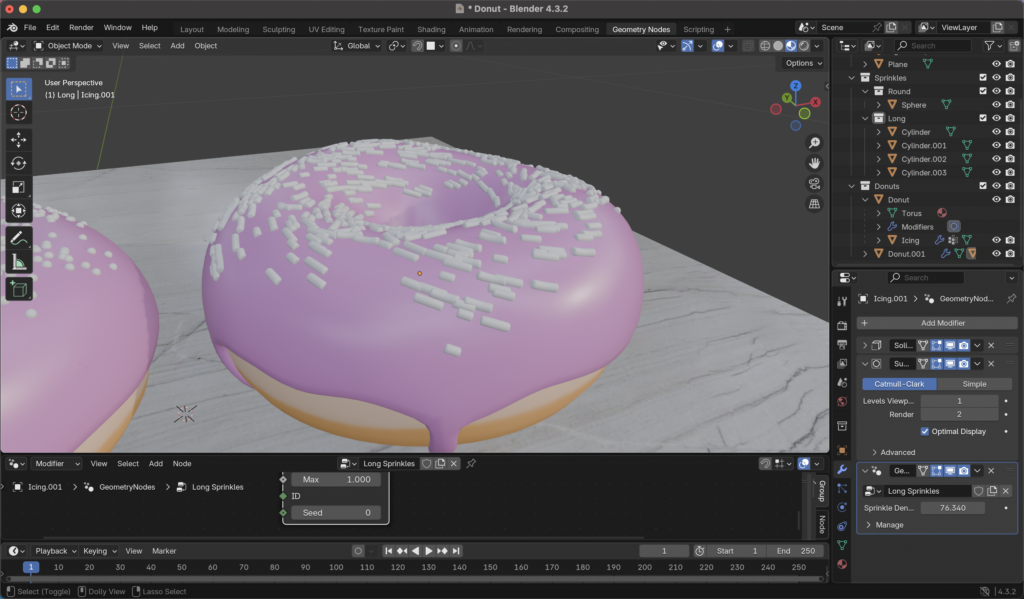
Actually applying the long sprinkles to the donut was an… interesting process. I’ve documented my progress below with screenshots to show you each state of the sprinkles on the donut, which I found kind of entertaining.
“Sprinkle City,” replacing the spheres with the cylinders on a duplicated donut without any modifications made them look like tiny little skyscrapers in a weird, pink valley.After adjusting their rotation to be relative to the icing, they looked like a type of mould or fungus growing over it.After rotating their source cylinders 90°, they lay flat on the surface of the icing, but still appear… uncanny.Playing with their rotation a bit, they begin to look like wispy hairs.More rotational editing. This makes them look like a whirlpool of sprinkles, which is cool, but not what I’m going for.
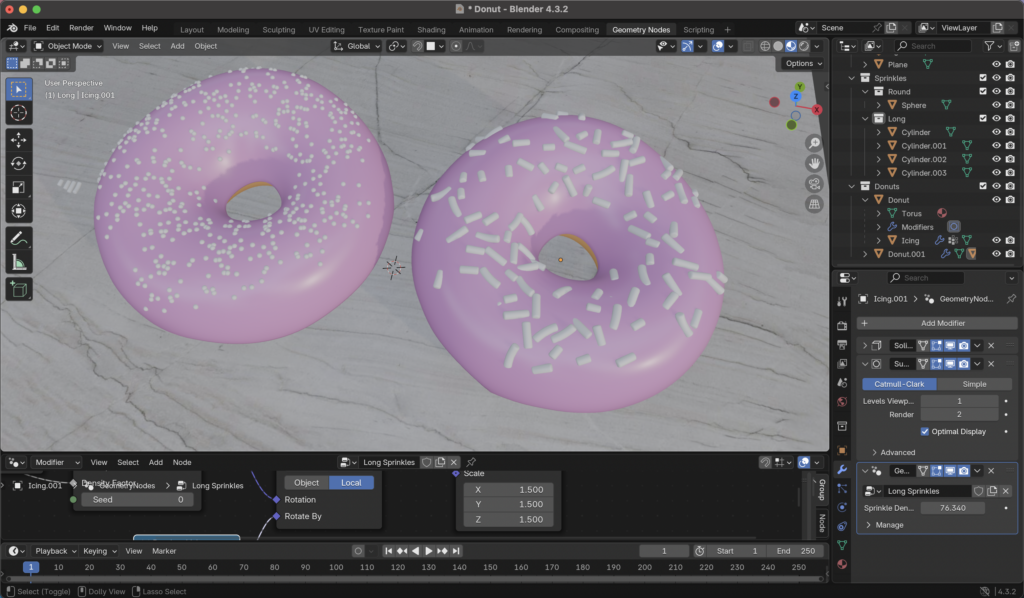
After adding a node allowing for randomized rotation, I made the sprinkles slightly bigger and ensured the minimum distance from each one was also slightly bigger due to this size increase. Finally, I ended up with this:
My two donuts!
Below is the linked video that I used for this part of the tutorial!
Today, I added sprinkles to my donut. This sounds like it would be a relatively simple procure, but the process to get there included quite a number of steps. This involved using geometry nodes, similar to the nodes used for textures, but designed for altering geometry and 3D forms instead. Using a scatter feature, I was able to create a simple sphere and “scatter” it along the surface of the icing. I was able to alter the size of the sprinkles, the amount of them, and the distance they sit apart from each other for as little clipping as possible. While this sounds all well and good, the sprinkles were scattered along every surface of the icing rather than just the top. This included the “drippy” parts and the underside of the icing as well.
The underside of my donut’s icing. Looks like some kind of alien nest.
Using a feature called weight paint, I was able to paint on my icing where I wanted the sprinkles to appear. I was then able to further limit the amount on the donut. Following this, I scaled the donut down in size as it was currently about 1.5m long. That is far too large for a donut, and while the size wouldn’t seem to matter when making just a single donut, it is good practice to keep things at an easy-to-reference uniform scale when 3D modelling for when other materials and forms are added to a scene.
While this is a shorter update, there is more to come as next time I learn how to put cylindrical sprinkles on my donut! Below I have attached a picture of my process and Blender Guru’s tutorial that I followed for this step of my Blender journey.
Today I was able to colour my donut and modify the textures and lighting to something a bit more realistic. I followed the next part in Blender Guru’s tutorial series to do this.
I learned a lot about texture today, and how texture typically works in 3D modelling. For the countertop that would hold my donut, I downloaded a texture from a 3D modelling reference website called Poliigon. This site was designed by Blender Guru and is a massive library for textures, models, and other 3D modelling assets. The resources here are available for use by 3D artists and animators and they are designed to match the industry standard. Many resources here are locked behind a paywall but there is a fairly massive free library available for use. While textures can be found on Google Images and other websites, they are usually consolidated into a single image. The textures available on Poliigon have multiple layers that are more designed for 3D modelling than flat images, which are typically used for 2D art and websites. Below, I’ll go into some detail about the texture I downloaded.
The texture I downloaded as part of the tutorial, for my countertop, was called “Denali Polished Quartzite Stone Texture, Gray” which downloaded as a .zip file and came with 5 layers.
From left to right, the layers are as follows: Base colour (main texture), displacement, metallic sheen, bump map, and roughness. All of these textures, while all five don’t particularly need to be used at the same time, combine to make a marble countertop texture that properly reflects light and has subtle chips, dents, scratches, and fingerprints on its surface.
The base colour texture for “Denali Polished Quartzite Stone Texture, Gray”
If I wanted to modify any of my texture, such as roughness or lighting, I can use the texture nodes available in the shading window.
The nodes can be seen in the lower half of the image, and can be moved around that window
I also learned how to make my own textures by adding a material to what I want to texture and then hitting “new” instead of “open” which would allow me to import a downloaded texture. In a new window, I selected a brush type and could draw directly on the donut. I drew the lighter line that would go across the centre of the donut (from when it bakes in real life and is not as dark as the top and bottom of it). Below is my created texture and the final result of the day’s progress.
My donut texture
I’ll also link the video tutorial I used in these stages for reference.
Today, a School District 61 teacher, Kristen, came in and talked to us about incorporating technology into outdoor education. One of the questions she asked us was what kind of technology we as teachers can use to help students foster a healthy relationship with the land. Some apps, programs, and websites that she recommended, along with some we came up with, are as follows:
We also touched on a few other things such as using cameras, educational videos, livestreams of forests, aquariums, eagles’ nests, and more. Another way I thought of using tech in this regard is by using VR, possibly for virtual field trips. This would be fun, however, even affording one VR headset for the classroom would be quite costly at this point. As a result, this would likely be at a point in the future when there are cheaper options available for classroom use.
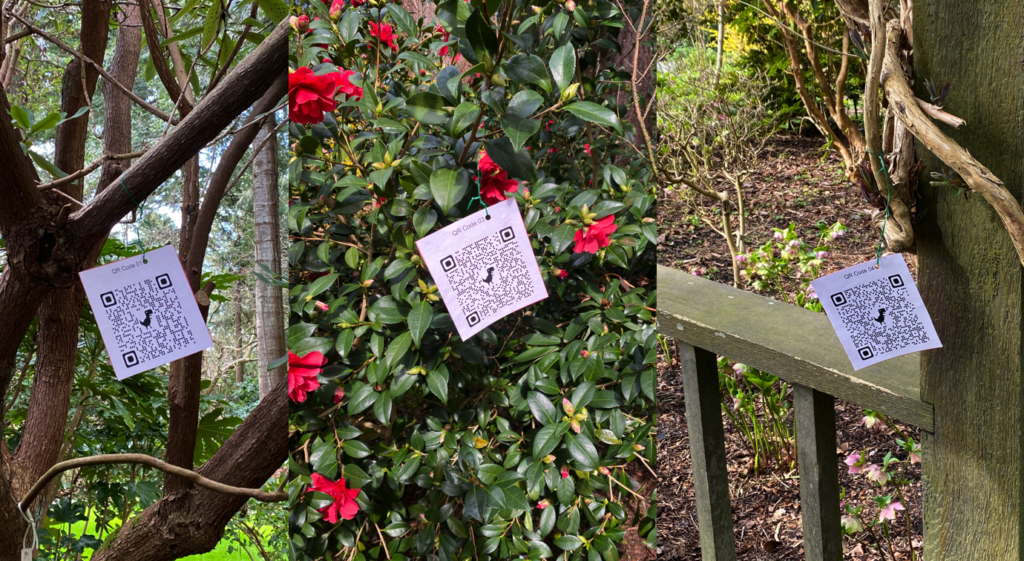
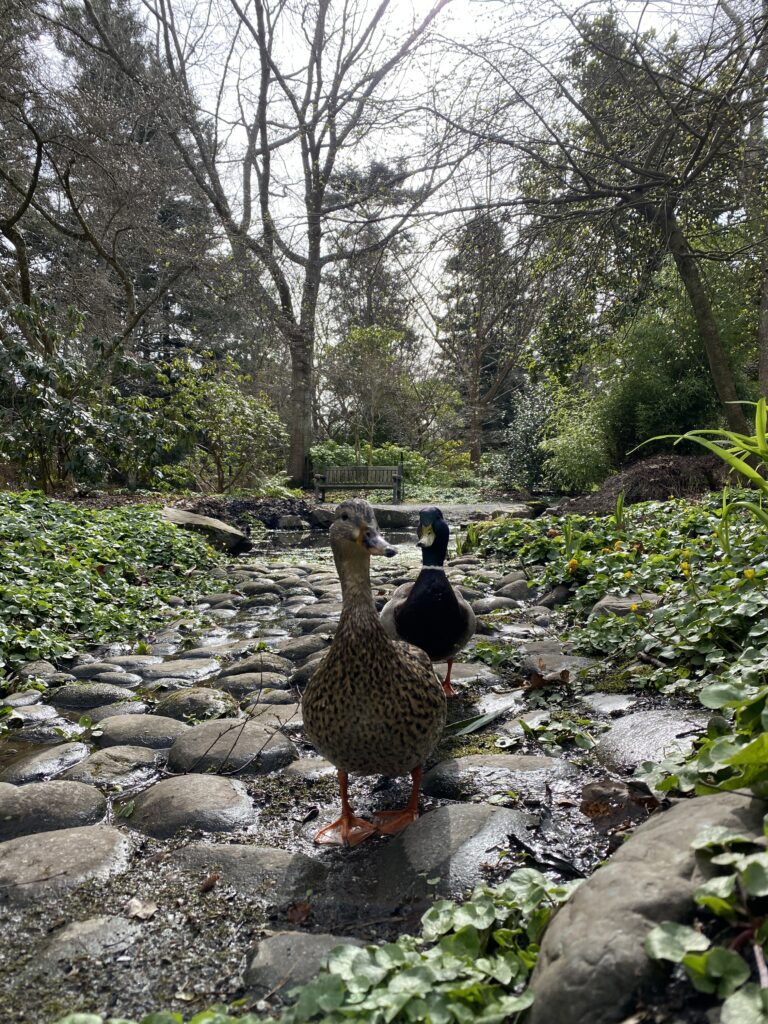
Following a brief presentation, we took the class outside into Finnerty Gardens for a scavenger hunt created for us by Michael. He had us find six QR codes placed by him that linked to different topics and videos connected to outdoor education and Finnerty Gardens. This would be a great activity to bring into the elementary classroom if we distributed devices that could scan QR codes. It would connect outdoor education with technology and be an engaging way for students to learn the material. If I were to do this with a class, I would make it so the students had to interact with and engage with the links in the QR codes for it to count towards their scavenger hunt. I fear that some students would run through the garden to get every QR code in the scavenger hunt without engaging with the resources simply so they could be the first to complete it. Overall it was a fun experience to work with my group! Below I’ve included pictures that I got in the gardens along with some examples of the QR codes.
Some QR codes posted by MichaelSome very friendly ducks coming to say hello!
In today’s session I was able to start work on my Blender donut! This was very exciting as I was able to practice a lot of the keyboard shortcuts that I learned in the last video. In case anyone following his tutorial may have forgotten them, he still went over what keys to hit and how to do many of the things covered in his last video. To start, I opened up a new file, deleted the default cube, and used shift+a to add the shape that would become my donut.
The humble torus.
In his first video, I learned how to bend the basics of the shape (width, size, etc), add modifiers to it, enter into Edit Mode from Object Mode, and bend and move parts of the vertices to create protrusions in the default shape. This added imperfections along the cylinder of the donut to make it more accurate to how a real donut bakes. I also flattened the sides a bit since donuts typically rise up while in the oven.
At one point, I struggled when selecting a full row of the donut’s vertices because I had forgotten I had turned on the option “Emulate 3D Mouse” in the last video when I attempted to model without a computer mouse. This proved nearly impossible, and I had gotten a mouse since then, but forgot to turn off that option which effectively rendered my Alt key useless. I needed my Alt key to select the full row at once, and a helpful commenter on that video brought up what to do when it wasn’t working. Through this help, I was able to correct my problem and finish the video without any other issues. Below is a photo of my progress and a link to the first video!
A very plain, grey donut.
In the second video I followed, we learned how to make the icing on the donut. Basically, it involved duplicating the whole thing and deleting the bottom half of it. Using modifiers, you can then make it bigger and thicker to look like icing coating the top of it. Then, through a number of other steps, you can bend the vertices of the icing layer and snap it to the donut to make it look like the icing is dripping down the sides. This is as far as his second tutorial video got! Below, I have another picture of my progress alongside a video link to his tutorial.
Today, Kaori Lau and Neesha Blajberg from the BCEdAccess Society zoomed in for a presentation with our class. BCEdAccess is a volunteer-run, non-profit organization supporting families with disabled members that struggle with equal accessibility in British Columbia schools. Their goal, largely, is to provide resources and education to educators so they can better help those that need the support. One thing we spent a lot of time discussing was how technology can be used in the classroom or school environment as a support tool for students that require it. Through a number of polls on Mentimeter, which I’m including here because it’s a great interactive tool for presenting and I would like to come back to it one day, the presenters were able to gauge where we’re at when it comes to what we know of tech as an accessibility tool. Some of the tools the class came up with were:
Text to speech
Subtitles
Translators
A microphone and speaker for the teacher
Hearing aids
iPads with accessibility apps
Chromebooks
Noise-cancelling headphones
AAC (Augmentative and Alternative Communication) devices
Audio recorders
Alternative keyboards
Spell checkers and grammar correctors
We also discussed how technology can be normalized as an accessibility tool in the classroom, as there are many people who view technology as little more than a distraction or a temporary support tool rather than something that can be utilized by a student indefinitely. Another prompt that we participated in as a class over Mentimeter was how we as teachers can help with this issue. Some of my classmates’ potential solutions were as follows:
Have discussions about the use of technology as an assistive tool.
Provide caregivers and school staff with open communication about its use.
Provide training to teachers and EAs about assistive technology and how to implement it in the classroom.
Speak up for the students.
Research new technologies and share with students, parents, and school staff.
Work with parents and students to set up appropriate uses of technology. This might look like setting time limits and restricting some apps and websites, but keeping the helpful ones available for use.
Have assisted technology listed in the students’ IEPs.
Advocate for the many benefits of assistive technology.
Advocate for funding and grants (SET-BC a good place to start).
One of the points our presenters made that resonated with me the most was a simple comparison made that shed light on how important it is to have technology as an accessibility tool in the classroom. One of them mentioned that we don’t tell students to take their glasses off when they write an exam, despite needing their glasses as an accessibility tool so they can see. Why then, should students who use technology as an accessibility tool have their use of it restricted? I feel like so many people shun the thought of using technology as a regularly occurring tool in the classroom simply because they did not grow up with it and have associated the word “technology” with entertainment and distractions. I believe technology should be common for its assistive purposes in the classrooms so it’s normalized as such and better understood by the wider population.
Here’s a video I found on the importance of assistive technology in the classroom:
Denver Public Schools. (2017, June 5). How assistive technology supports students with disabilities [Video file]. YouTube. https://www.youtube.com/watch?v=wIPZyXuD5XM
Today we looked at artificial intelligence (AI) in more depth than previously discussed. We started with GenType, a program created by Google Labs that uses AI image generation to create every letter of the alphabet based on user prompts. For the above prompt, I entered “Bubbles underwater,” and it created an alphabet based on that description. This can be a really fun thing to add to your slides or documents as a teacher, as it can easily match whichever lesson it’s used for.
Generated by me using GenType by Google Labs
We also discussed how AI is implemented into everyday life, such as algorithms on social media, recommendations on sites like YouTube and Netflix, suggestions in search engines such as Google, routes to take on Google Maps, and much more. These are examples of predictive AI.
We got the chance to play around with ChatGPT as well, and we discussed some of the reasons why AI is not favoured by many. My cohort spans from people who are highly optimistic about AI, such as myself, to people who are avidly against it. I have my own concerns about certain aspects of AI, such as how image generation uses any given artist’s work without their permission, however I also understand that it’s here to stay and it is something we cannot ignore in our classrooms based on our personal biases. It is incredibly important that we educate our students on safe and responsible use of programs such as ChatGPT and other text and image generators. This could involve bringing a professional into our classroom, discussing the subtle biases in these programs, informing about it’s detrimental environmental misuse, being mindful of our reliance on it, and explaining how it works to students who are otherwise unaware of these points.
As teachers, it is very possible that we will one day face being presented with an assignment that was completed by AI. As students, it is also possible that we’ll one day be accused of using AI on an assignment when we have not. These are situations very new to our society as AI this intelligent has only been available to the public for a few years now. One way to get around this, as a student, is you can show your document in history in Word and Google Docs. As a teacher, we can make the learning assessment based more around their process rather than their outcome. This may be one way we can get around students sneakily using AI and we can ask them unique questions about their own personal learning that is other unanswerable by something like ChatGPT.
I’ve included a video below about a school in Newark, New Jersey that has brought AI into their classroom. Here they can teach students about AI in a safe environment, where if any misconduct is done with the AI by a student, an alert is sent to the teacher. While I would still want to be the one in control of my student’s learning, I believe programs like this will become more and more commonplace around school districts in the future.
CBS News. (2024, February 22). AI education tools are helping students learn, grow and gain confidence [Video file]. YouTube. https://www.youtube.com/watch?v=wIPZyXuD5XM
Today, we touched on the topic of digital curation and took part in an Ed Camp using discussion prompts created by our peers around the classroom. An Ed Camp is a user generated conference where teachers join up and discuss different topics usually related to education. In this reflection, I will mainly be focusing on our Ed Camp discussions. I shifted to another group partway through, and have things I can reflect on about two different education related topics.
Before separating into our different groups, we got a sticky note with some time to think about potential topics and were given a set of stickers to vote for our top three favourite prompts. I had trouble coming up with an idea myself, but my classmates came up with all good ideas. Below is a picture of some of the sticky notes, taken by our instructor Dr. Michael Paskevicius.
I voted for the prompts that would discuss video games and movies in the classroom, as well as the topics covering field trips and mental health. While the one on video games and movies did not make the final vote for the whole class, the last two did and I was able to join these groups in their discussions. The prompts for these break-out groups were worded as such: “What are the best field trip ideas? + Why?” and “How can teachers help make a less anxious/depressed generation?” Below, I outline some of what we talked about in each group.
“What are the best field trip ideas? + Why?“ The first group I joined talked about field trips. Specifically, when we as teachers would decide to have them and what their focus or purpose would be. A lot of ideas were generated in this discussion, and we began with why we take students on field trips in the first place. One person said it should be related to learning something new, while another added that it should compliment what the students have learned prior. For example, the students might have a unit covering the life cycle of salmon and then go on a field trip to Goldstream Provincial Park to see the salmon run firsthand. Another person said it was fine going on a field trip just to give the students a break from their studies and let them try a new experience. For example, going to the opera would be good for them so they can get out of the school environment for a bit and say that they’ve been to the opera before.
We also talked about the logistics of planning field trips and what might be involved in this process. Some were saying to plan for field trips in August and to start applying for grants early since funding can be a nightmare. Another person said it would be ideal to wait so you can know your class before you plan, but we all recognized that this isn’t always an option. I mentioned that funding can be brought down by transporting students via the city bus (class and age dependant of course) or utilizing the cars of parent volunteers.
We also talked about “virtual” field trips, field trip location ideas, and more. Partway through, we took a short break and I navigated to the other group discussing mental health in students.
“How can teachers help make a less anxious/depressed generation?“ This group was partway through their discussion already when I joined, but I was able to keep track of a number of things that were brought up. We talked about a number of reasons why students may be struggling in today’s modern society, and we came up with a number of factors that may be related. This includes, but is not limited to: • Screen time and it’s effects on students • Sedentary time (generally relating to screen time) • Upbringing and parenting style • Biological factors, ingrained with life experiences or trauma
The group transitioned into discussing ways that we as educators can help counter some of these factors, or at least make the classroom environment a safe place for struggling students. One person talked about how many parents may watch the news in the morning, which is generally filled with negativity and shows viewers all the bad stuff that is happening locally or around the world. We thought about how we could talk about the good things that have happened in the world with students, or covering one good thing per day that has happened to boost spirits in the morning. We also talked about promoting empathy in our classrooms and encouraging students not to be too hard on themselves. One person brought up implementing health and wellness classes in younger grades and another brought up the balance between being kind and warm as a teacher but also being firm with rules and expectations.
At this point, we had to return to class but I believe I learned a lot through these discussions and am very fortunate to have learned what an Ed Camp is so I can look out for them in the future.
Included is a video I found after the second discussion that touches on student mental health and the importance of encouraging mental health days for students. The video is a Ted Talk, based in the US, but it covers the same issues faced by Canadian students and can easily be introduced in Canada if it has not been already. I highly recommend giving it a watch.
TEDx Talks. (2020, February 1). Why you should take a break: Prioritizing mental health in schools | Hailey Hardcastle | TEDxSalem [Video file]. YouTube. https://www.youtube.com/watch?v=vD0w_gOEbUI